
We all are intrigued by puzzles, especially kids. They enjoy solving puzzles as their favorite game. Even in the digital world, the craze for physical puzzles hasn’t gone yet. With unique designs and images, puzzles can be made even more interesting. So, how can we use a Cricut machine to create a puzzle? We will answer that in this blog which includes a tutorial to make a puzzle using the Cricut machine. So, let’s see how to make a puzzle with Cricut.
STEP 1: DESIGN YOUR PUZZLE
In the first step, you are required to design your puzzle. So you can do this by signing into the Design Space. Visit design.cricut.com and log into your Cricut Design Space to get the puzzle templates.
STEP 2: GO TO NEW PROJECT OPTION
In your Design Space, search for a puzzle, and you will get so many free Cricut puzzle templates. Well, some of the templates will need a subscription. So, if you don’t have a subscription, put a filter as “free.” So, there are almost over 3000 free puzzle templates in the Design Space.
STEP 3: UPLOAD THE TEMPLATE TO DESIGN SPACE
So, once you choose your puzzle template, drag it to the canvas. Hence, you will have the option to upload the image on your Design Space. To make your Design transparent, tap the eye icon, which is placed next to the Cricut puzzle template.
STEP 4: UPLOAD YOUR PICTURE
To upload the image of which you want to make a puzzle from the left side of Canvas. You can also use the previous files which you’ve used before. When you pick up a picture, you can select an image type to proceed. There are three options to choose from- Simple, moderately complex, and complex.

These options allow you to make your puzzle design look contrast, monochrome, or colored as per your choice. You can select any one option to create an image of your choice.
STEP 5: LOAD THE IMAGE TO YOUR DESIGN SPACE
When you have selected the image and image type, you are all set to load it on the Design Space. Well, the complex image type may take a while to load. So, let it upload on the Design Space. Either you can drag the image right into the canvas by clicking its corner.
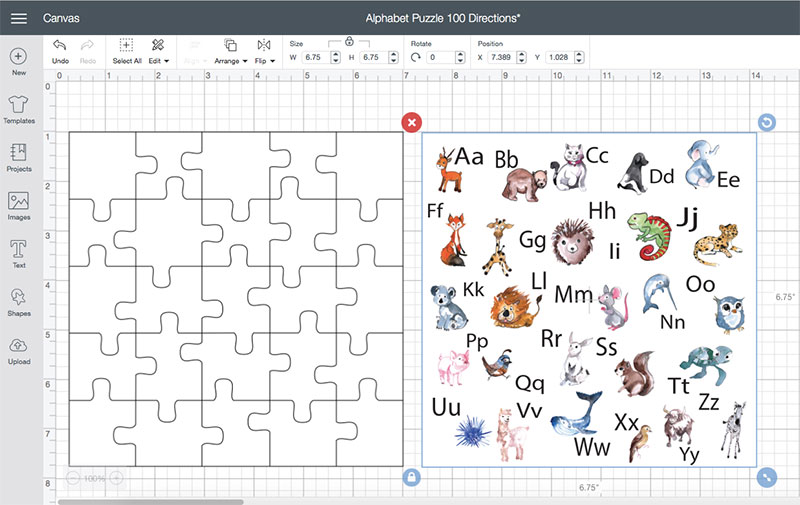
STEP 6: UNGROUP THE PUZZLE
First, click the “Ungroup” option in the corner of your canvas. So it will be easy to modify your puzzle. After that, click on the picture and drag it into the image in a way that it goes behind the previous image. But, if you want only a part of the image to be a puzzle, adjust your image in a way that covers only that part of the image. To get the full image to be as a puzzle, drag and adjust your image to align it with the puzzle template.
STEP 7: ATTACH YOUR TEMPLATE AND IMAGE
This step is done to secure the image. So it will not interrupt your work. And check that the image is set right in the place where you want it to be before the printing process. In case the unnecessary parts of your image are going outside of your puzzle area, remove them by using the “Slice” option at the bottom left corner to attach them to your puzzle template.
STEP 8: PRINT THE IMAGE ON VINYL
Insert the vinyl or sticker paper in your printer and pick a material to print the image. Then, click the “Continue” button to print the image. To buy the template, hit the green “Purchase” button to print the image.
STEP 9: PLACE THE IMAGE PIECE ON A CARDBOARD/CHIPBOARD
First, peel the vinyl or sticker paper image and gently press it down onto a cardboard or chipboard. Now, make the image smooth and remove bubbles. Also, be specific about your board thickness. And your screen will also prompt you to use a specific blade in your Cricut and also a mat according to your material.
STEP 10: CUT THE PUZZLE IMAGE
So, first, put your printed image on a cardboard or chipboard along with the Cricut mat. Then, make it smooth and tape the edges so that it doesn’t move. Use a strong cutting mat so that the blades don’t damage it.
STEP 11: PUT THE KNIFE BLADE INTO CRICUT MACHINE
On your Cricut Maker machine, open the front of your machine and pull the clamp which grips the tools. Load the knife blades and then close the clamp. Then, click the Load button.
STEP 12: CUT THE PUZZLE PIECES
Your Cricut machine will start cutting the puzzle pieces by passing through the image many times. It will take time to cut all the pieces, so be patient while doing this.
STEP 13: UNLOAD THE MAT
Before unloading the mat, check if the puzzle is cut. To check it, lift the edge of a nearby piece and see if the blade has cut the material. If everything seems right, hit the Unload button to take off the mat. If cuts are not through, again, run the Cricut to cut them.
STEP 14: TAKE THE PUZZLE PIECES FROM MAT
In the last step, you can simply take out the puzzle pieces from the mat. If the pieces are stuck to the mat, use a spatula and remove the piece with it.
Finally, your Cricut puzzle is ready. Give it to the kids and let them enjoy it. It will be a perfect exercise for them. Here is our guide on how to make a puzzle with Cricut ends.
FAQS
CAN I MAKE A PERSONALIZED PHOTO PUZZLE WITH CRICUT?
Yes, you can make a personalized photo puzzle. You just have to import your photo into the Design Space and adjust it according to the required shape and size. Then, follow the steps to cut and assemble the puzzle pieces. Always use a suitable material for cutting photos, like cardstock and photo paper.
HOW DO I INCREASE THE DIFFICULTY LEVEL OF MY CRICUT PUZZLE?
If you want to increase the difficulty level of your Cricut puzzle, you can increase the number of puzzle pieces to make the puzzle. To do this, use smaller pieces and put complex designs and shapes into your puzzle design. But don’t forget that the complex Design may be difficult for the Cricut machine to cut. Hence, select the level according to the capability of your Cricut machine.
CAN I CREATE A 3D PUZZLE WITH CRICUT?
Yes, you can create a 3D puzzle with Cricut by using multiple layers of cut pieces. However, the Cricut machines are made for cutting flat materials. For 3D Design, each layer of the puzzle is separated in Design Space, cut them out, and then stacked and adhered to the layers together to form a 3D puzzle. Ensure the pieces fit together securely to maintain the structure of the puzzle. Experiment with different designs and layering techniques to get the desired 3D effect.
Get More information :-